DIY Ideas, Newsletter Articles
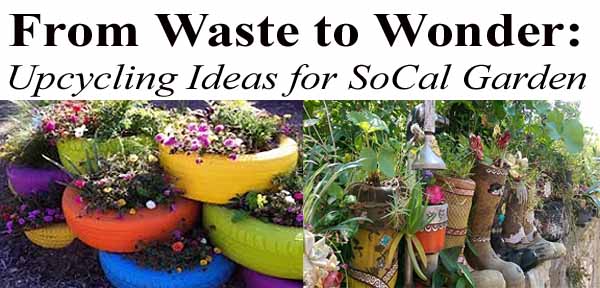
From Waste to Wonder: Upcycling Ideas for SoCal Garden Decor
The Beauty of Upcycling in Gardening
Upcycling isn’t just a trend, it’s a mindset. A commitment to sustainability, it also showcases the art of turning what’s disregarded into something delightful. In a garden, upcycling plays a dual role.
Firstly, it offers an eco-conscious way to introduce new elements into your space without the need for buying fresh items. While purchasing a new planter for your garden is always a nice add, why not mix things up once in awhile and try an old tire or wooden pallet which can be transformed into something gorgeous with a touch of creativity! Each upcycled item carries a story, a narrative of its previous life, and its renewed purpose, making the garden richer in tales and textures.
Secondly, upcycling champions the principles of nature. In ecosystems, nothing goes to waste. Every fallen leaf, every withered flower plays a role. Similarly, in upcycled garden decor, there’s an affirmation that everything holds potential. With imagination and effort, what once seemed redundant finds new meaning, enhancing the garden’s aesthetic and purpose.
Intriguing Upcycled Garden Decor Ideas Tailored for SoCal
1. Old Tires turned into Vibrant Planters
By painting and stacking discarded tires, we can create an innovative planter fit with stunning plants, mimicking the terraced landscapes of our coastal cliffs.
Materials Needed:
- Discarded tires (1 or more, depending on your design vision)
- Outdoor paint in your choice of colors
- Paintbrushes
- Potting soil
- Plants
Plant Suggestions: Silver Dust (Senecio cineraria) or Ornamental Grasses such as Fountain Grass (Pennisetum setaceum).
- Why:
- Silver Dust (Senecio cineraria): This plant features silvery-gray foliage, which acts as a neutral yet visually engaging backdrop against the vibrant colors of the painted tire. Its delicate, lacy leaves introduce a texture that contrasts with the smoothness of the painted tire, making the ensemble aesthetically balanced.
- Fountain Grass (Pennisetum setaceum): Ornamental grasses bring movement and a softness to garden spaces. Fountain Grass, with its arching plumes and feathery seed heads, can create a dynamic interplay with the static, bold tire planter. The deep purples and greens of the grass can either complement or contrast with the tire’s color, depending on the chosen paint hue, offering flexibility in design choices.
Pairing the vibrancy of the painted tire with plants that offer texture and a somewhat subdued color palette ensures that the overall look remains harmonious and not overwhelmingly colorful. The combination also brings out the brilliance of the painted tire while giving ample spotlight to the beauty of the plants.
Steps:
- Preparation: Begin by cleaning the tire thoroughly to remove any dirt or residues. You can use soapy water and a scrub brush. Let the tire dry completely.
- Painting: Choose an outdoor paint that will withstand the elements. Begin by applying a base coat to ensure uniform color. Once dried, apply the desired paint color. Consider bright, contrasting colors to make the planter pop against your garden backdrop.
- Stacking (Optional): If you’re using multiple tires, you can create an elevated look by stacking them. Secure them in place using adhesive or by nailing them together for a more sturdy structure.
- Planting: Fill the tire with potting soil, ensuring you’ve added enough depth for your plants’ roots. Then just dig a small hole for each plant, insert your chosen plants, water them, and watch your tire planter come to life!
2. Broken Ceramics as Mosaic Pathways
It’s heartbreaking when a cherished ceramic pot shatters. However, instead of lamenting its loss, consider repurposing the fragments. By embedding them into garden pathways, they become a testament to the beauty that emerges from brokenness—a condition all too familiar for SoCal gardeners battling the relentless sun.
Materials Needed:
- Broken ceramic pieces (from pots, tiles, or dishes)
- Concrete or stepping stone mold (available at gardening centers)
- Premixed concrete
- Safety gloves and goggles
- Grout (if desired)
- Plants
Plant Suggestions: Groundcovers like Creeping Thyme (Thymus serpyllum) or Blue Star Creeper (Isotoma fluviatilis).
- Why: As the mosaic pathway becomes a focal point, the adjoining plants should enhance its beauty without overshadowing it. Groundcover plants like Creeping Thyme or Blue Star Creeper can grow along the sides of the pathway, framing the ceramic pieces. Creeping Thyme has the added advantage of being aromatic, releasing a pleasant scent when walked upon, thus making your mosaic pathway not just a visual but also an olfactory experience.
Steps:
- Safety First: Before starting, don your safety gloves and goggles. Broken ceramics can be sharp, so handle with care.
- Design Your Mosaic: On a flat surface, layout your ceramic pieces in the pattern you desire for your pathway. This pre-visualization is crucial.
- Prepare the Concrete: Follow the instructions on your premixed concrete to prepare it in a bucket or mixing tray.
- Pour and Place: Once your concrete is ready, pour it into the stepping stone mold. Before it sets, begin placing your ceramic pieces into the concrete, following your pre-designed pattern. Press each piece down so it’s flush with the concrete surface.
- Setting: Allow the concrete to set according to the product’s recommended time, typically 24 hours.
- Grouting (Optional): If you wish for a more polished look, once the concrete has dried, you can fill the gaps between the ceramics with grout. Wipe away the excess with a damp sponge.
3. Wooden Pallets transformed into Vertical Gardens
For gardens tight on space, verticality is the key. Old wooden pallets, often discarded after a single use, can be refurbished as vertical garden structures. It’s vital to ensure that these pallets have well-draining sections to prevent root rot—a condition where the plant roots decay due to prolonged moisture exposure.
Materials Needed:
- An old wooden pallet
- Sandpaper
- Potting soil
- Landscaping fabric
- Staple gun
- Plants (preferably those suitable for vertical planting)
Plant Suggestions: A mix of Succulents (like Sempervivum and Echeveria) and Ferns (such as Maidenhair fern or Boston fern).
- Why: Pallets offer compartments that can be used to create a visual tapestry of plants. Succulents, with their varied shapes, colors, and textures, are great for lower maintenance sections and can give a modern edge to the vertical garden. Ferns, on the other hand, can introduce a softer, feathery texture and give a lush, green background to the brighter, bolder succulents. Together, they evoke a sense of a mini ecosystem, a beautiful blend of the arid and the tropical, right in your Californian garden.
Steps:
- Preparation: Start by sanding down the pallet, focusing on any rough spots, to avoid splinters. This step also helps in preparing the wood for painting or staining if desired.
- Lining: Attach the landscaping fabric to the back, bottom, and sides of the pallet using the staple gun. This fabric will hold the soil and plants in place. Ensure no gaps remain.
- Soil and Planting: With the pallet laying flat, start adding potting soil into the slats, pressing it down to ensure it’s compact. Next, begin planting your chosen plants in the gaps, ensuring they’re secure.
- Standing the Pallet: Allow the plants to take root while the pallet is still flat, typically a week or so. After this, you can safely position your pallet vertically.
4. Worn-out Boots as Whimsical Plant Holders
The connection between a gardener and their shoes is intimate. When it’s time for your old boots to retire, fill them with potting soil and snugly nestle plant cuttings within. Over time, as the plants flourish, they narrate the countless hours you’ve spent nurturing your green haven.
Materials Needed:
- Old boots or shoes
- Potting soil
- Pebbles or small stones for drainage
- Small plants or succulents
Plant Suggestions: Compact plants with striking foliage or flowers, such as Sedum morganianum (Burro’s Tail) or Echeveria.
- Why: Given the smaller space inside a boot, you’d need a plant that doesn’t grow too large. Succulents, like Sedum or Echeveria, are perfect as they can thrive in confined spaces and can handle the occasional moisture inconsistency. Their unique textures and colors also contrast beautifully with the rugged appearance of the boot.
Steps:
- Cleaning: Start by cleaning the boots, removing any mud or dirt. They don’t have to be spotless, just reasonably clean.
- Drainage: Before adding soil, place a layer of pebbles or small stones at the bottom of the boot. This will help in drainage, ensuring that excess water doesn’t accumulate at the base.
- Filling with Soil: Begin adding potting soil, ensuring it’s compact but not overly tight. Leave enough room at the top to accommodate your chosen plants.
- Planting: Now, delicately plant your chosen greenery into the boot. Water them slightly, ensuring the soil is moist but not drenched.
- Positioning: Place your boot planters in an area where they’ll receive the right amount of sunlight, based on the plants you’ve chosen. Given the unique nature of this planter, they’re bound to be a conversation starter!
5. Bicycle Basket Blossoms
Turn an old bicycle into a mobile garden, utilizing the basket as the primary planter.
Materials Needed:
- An old bicycle with a basket
- Soil
- Plants
Plant Suggestions: Vibrant, sun-loving annuals like Petunias (Petunia x hybrida) or Geraniums (Pelargonium).
- Why: Given that bicycles might be placed in areas receiving full sun, sun-loving plants are ideal. Petunias and Geraniums provide a burst of color, and their growth pattern can beautifully spill over the sides of the basket, creating a visual spectacle. Their bright hues contrasted against the bicycle’s structure make the garden space lively and dynamic.
Steps:
- Preparation: Clean the bicycle and basket to remove any dust or rust. If desired, you can repaint or decorate the bicycle for added flair.
- Planting: Fill the basket with soil and plant your chosen annuals.
- Positioning: Find a sunny spot in your garden or yard and position the bicycle. Ensure it won’t easily topple over—consider leaning it against a wall or fence for stability.
Each of these ideas merges the utility of reused items with the beauty of plants, creating green spaces that are unique, sustainable, and visually engaging.
6. Repurposed Toy Garden Planters
Transform old toys into delightful planters, adding a touch of whimsy to your garden or interior space.
Materials Needed:
- Old toys (large plastic ones, such as toy trucks or doll heads, work best)
- Soil
- Plants
- A drill (for drainage holes)
Plant Suggestions: Petite flowering plants like Alyssum (Lobularia maritima) or ornamental grasses like Blue Fescue (Festuca glauca).
- Why: The whimsical nature of using toys as planters is complemented by plants that have a soft, delicate, or playful appearance. Alyssum, with its tiny white or purple flowers, can make the toy seem as if it’s overflowing with mini blooms. Blue Fescue’s tufted growth can appear as though the toy is sporting a quirky, blue-tinted hairstyle, adding to the charm.
Steps:
- Preparing Toys: Clean the toys thoroughly. If they are not already open at the top, you may need to carve out a space to hold the soil and plants. Drill a few drainage holes in the bottom.
- Planting: Fill each toy with soil, then plant your chosen plants.
- Display: Place your toy planters in a spot where they’ll be most appreciated—whether that’s a patio, window ledge, or garden bed.
7. Suspended Tin Can Herb Garden
By suspending repurposed tin cans, you can create a floating herb garden that’s both functional and aesthetically pleasing.
Materials Needed:
- Empty tin cans (labels removed and cleaned)
- Strong twine or metal chains for suspension
- Soil
- Plants
- A drill (for drainage holes and suspension holes)
Plant Suggestions: Aromatic herbs like Rosemary (Rosmarinus officinalis), Thyme (Thymus vulgaris), and Basil (Ocimum basilicum).
- Why: These herbs not only smell fantastic but also have shallow root systems, making them ideal for tin cans. Their lush green leaves juxtaposed against the metallic sheen of the cans would create a delightful visual. Plus, the convenience of having fresh herbs right outside your door adds a functional aspect to the decor.
Steps:
- Preparing Cans: Using a drill, make a few drainage holes at the bottom of each tin can. Additionally, make two holes on opposite sides near the top edge for the twine or chains.
- Suspension: Thread twine or chains through the top holes, securing them tightly.
- Planting: Fill each can with soil and plant your chosen herbs.
- Hanging: Suspend the tin cans from hooks on a wall, balcony, or any overhead structure.
Inviting Wildlife through Upcycled Structures
Creating upcycled structures isn’t just about aesthetics; it’s about creating sanctuaries for the local fauna. For instance, a stacked tower of old bricks, with spaces left intentionally, becomes a refuge for insects. A discarded teapot or ceramic jug, suspended from a tree, transforms into a quirky birdhouse.
The choice of materials in upcycling can also be pivotal in attracting specific wildlife. By using native materials and plants in your upcycled projects, you’re essentially rolling out a welcome mat for the local wildlife, ensuring they find familiarity amidst innovation. As your garden hums with life, from buzzing bees to fluttering butterflies, the space becomes a thriving habitat, merging the crafted with the wild in a seamless symphony.
The Emotional Arc of Upcycling
Emotionally, upcycling is deeply rewarding. It begins with the act of rescuing—an old item, once cherished, now forgotten. The process of transforming this object, nurturing it with new purpose, mirrors the gardener’s relationship with plants. As you infuse life and beauty into a discarded tire or a rusty tin can, there’s an emotional parallel to planting a seed and watching it grow.
Moreover, upcycled items often carry memories. That old wooden ladder turned into a vertical garden might be a relic from a grandparent’s home, echoing stories of yesteryears. Each time you look at it, you’re not just seeing blooms, but a tapestry of personal history interwoven with new experiences.
Inviting You to Join the Upcycling Journey
By now, it’s evident that upcycling transcends mere repurposing. It’s about cultivating creativity, fostering sustainability, and nurturing emotions. For those who’ve felt the joy of seeing a plant grow from a tiny seed to a flourishing entity, the thrill of upcycling resonates at a similar frequency.
For those keen on exploring this unique blend of art and sustainability further, a visit to Green Thumb Nursery will be a rendezvous with inspiration. Discover more upcycling ideas, learn from seasoned gardeners, and equip yourself with the tools and knowledge to sculpt a garden that’s not just green in hue, but in ethos as well.
Do you like what you see? Sign up for our weekly newsletter to get content like this every week!